ShopDreamUp AI ArtDreamUp

Deviation Actions

BW Single Character Requests
You pick what I draw! Black and white/ inked (digital) drawing - existing characters only - no revisions - one character at a time
$10/month


Suggested Deviants


Suggested Collections


You Might Like…


Featured in Groups
Description
Guess what, guys? Since so many of you have asked about my digital art process, I've decided to let you in on how I do things! Okay, nobody really asked about my process. Whatever. I'm going to show you anyway. Maybe, after seeing my fumbling, clumsy technique, you'll learn what not to do. Anyway...
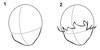
1. I always try, if I've got time, to do a few sketches to get a feel on what direction I'd like to take the piece.
2. Everything I do starts with a pencil drawing, even if (like in this example) the lines don't make it to the final piece. This is done by laying out the drawing in non-photo blue, then laying clean pencil lines over that. In this case, the lines aren't so clean, mostly because I was impatient to get to coloring.
3. Next, I lay down flat colors. You'll notice there are a few areas where I've used layer styles to add inner shadows and whatnot. I sometimes start that kind of thing early on, to help inform my lighting later. I also lay down a nice, grimy background texture and add a lighting gradient to suggest the dominant light source. I've got a pretty good collection of stock photos gleaned from digital art magazines, but there are a few good stock sites out there where you can get free textures like this one.
4. I've started rendering by adding lighter and darker areas of tone. It's usually easier for me to pick out anatomical mistakes once I see them on a monitor, and I'll start correcting those at this point as well. I've added some electrical energy coming out of his hand, too. I usually do that here, instead of in the pencil drawing, just to make things a little easier on myself.
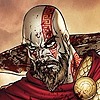
5. Viola! The pencil lines are removed, and extra definition is added to forms where it's needed. Also, now is when I add any airbrush glowing effects, and I've given the entire pic a light texture overlay and a subtle blue tint. In the back, I throw a "broken glass" texture down to play up the characters powers. Add my sig at the bottom, and that's a wrap!
Not so hard, right?
1. I always try, if I've got time, to do a few sketches to get a feel on what direction I'd like to take the piece.
2. Everything I do starts with a pencil drawing, even if (like in this example) the lines don't make it to the final piece. This is done by laying out the drawing in non-photo blue, then laying clean pencil lines over that. In this case, the lines aren't so clean, mostly because I was impatient to get to coloring.
3. Next, I lay down flat colors. You'll notice there are a few areas where I've used layer styles to add inner shadows and whatnot. I sometimes start that kind of thing early on, to help inform my lighting later. I also lay down a nice, grimy background texture and add a lighting gradient to suggest the dominant light source. I've got a pretty good collection of stock photos gleaned from digital art magazines, but there are a few good stock sites out there where you can get free textures like this one.
4. I've started rendering by adding lighter and darker areas of tone. It's usually easier for me to pick out anatomical mistakes once I see them on a monitor, and I'll start correcting those at this point as well. I've added some electrical energy coming out of his hand, too. I usually do that here, instead of in the pencil drawing, just to make things a little easier on myself.
5. Viola! The pencil lines are removed, and extra definition is added to forms where it's needed. Also, now is when I add any airbrush glowing effects, and I've given the entire pic a light texture overlay and a subtle blue tint. In the back, I throw a "broken glass" texture down to play up the characters powers. Add my sig at the bottom, and that's a wrap!
Not so hard, right?
Image size
2880x720px 886.45 KB
© 2010 - 2024 GavinMichelli
Comments19
Join the community to add your comment. Already a deviant? Log In
Wow, this is really amazing, now here comes the question, for my class i'm doing a digital art's poster. It's my final but also the contest so i was looking for a "step by step" kinda thing and yours is perfect so i was wondering if i would be able to use it. I wont be getting paid anything for the contest it'll just be put up in the school office, but i wanted to ask, so that i may have your permission, because it is your work.